Photography with flare
Do your photos have flare? Yes, those little spots of colour running across the image. They weren't there in the scene that you saw were they. Or maybe there is just a strange type of fog wafting across your image. That wasn't there either, was it. The likelihood is that what you are seeing is flare, caused by light bouncing around between the elements of the lens. The light itself may not have been visible within the viewfinder image, in which case the chances are that it was just outside the frame when you took the photo.
I recently talked about introducing flare into an image with the intention of conveying a sense of intense light. But sometimes flare creeps into our pictures when we would prefer that it didn't.
There are a number of things that we can do to stop the light flaring into the lens. On all but the widest lenses a lens hood is an essential. Many lens manufacturers sell lens hoods designed specifically for a particular lens, and these are normally made out of rigid plastic. Sometimes they even come supplied with the lens (why is this not standard practice with every manufacturer and on every lens?). The idea is to cut out any light that is not going to form part of the image. If you don't have a hood for every lens that you own then may I suggest a trip to the camera shop is in order.
The biggest shortcoming with lens hoods occurs with zoom lenses, and because most people predominantly use zoom lenses these days this applies most of the time. The hood must be designed so as not to be visible in the image at the shortest focal length (widest angle of view). It follows that at all other focal lengths the hood is not working as efficiently as one might wish. Also, many lens hoods are cut off straight at the end. Now it is true that the lens receives a cone of light, but the image is rectangular, so a rectangular lens hood (or petal lens hood) is more efficient in most cases.
For studio work I often use a bellows lens hood, which is square, but as the format that I use is not square but an elongated rectangle there is still some room for improvement. In the studio it is common practice to put pieces of card in between the lens and any light that might otherwise shine into the lens, so as to cast a shadow in the direction of the lens. This is referred to as a flag. The same method can be used when outside by holding something by hand so that it casts a shadow on the lens.
Of course the light source might be within the image. Much of the time and with most lenses there is just no way round the fact that this will cause flare. In many situations we can at least have some control of how the flare shows in the image. To minimise flare the lens should be clean. Dust and fingerprints on the lens will scatter light, reducing contrast. Using a smaller aperture will reduce the size of the little disks of light that you often see if the sun is in the frame. Finally, see if it is possible to manoeuvre so that the light source is at least partially behind something - the branch of a tree for instance. This can give you a degree of reduction in visible flaring (see the picture that accompanies the piece called "Doing it with flare").
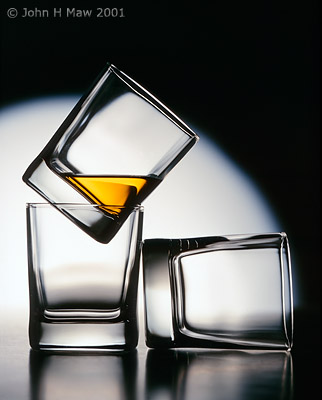
The image above was taken directly into the only source of illumination. Flare was avoided by using a good quality lens which was free of dust and fingerprints (Schneider Symmar-S 240mm on Sinar P). A less diffused light source would be more likely to generate flare.
posted by John Maw at 5:26 pm
![]()
0 Comments:
Post a Comment
<< Home