Wednesday 18 July 2007

The Hartblei 45mm Super-Rotator (Part 3)


Nearly there. This is the third and final part of a piece that I have put up here about the modification and use of my Hartblei 45mm Super-Rotator. This last part is primarily concerned with identifying and combating problems of flare. As I said previously the lens itself doesn't seem to have a particular problem with flare. It seems very good in quite challenging situations. But there were times when I saw unusual and pronounced flare, and I felt that this was caused not by the optics of the lens, but by light hitting the camera sensor and then reflecting back towards the lens and hitting a surface that bounced that same light back towards the sensor again (still with me). I also felt that the culprit was the shift adaptor, not the lens. The result in very high contrast situations was patches of fogging (as seen over the roof the first of the church images just below).


I wasn't sure what measures would be needed to cure the problem, never having had to deal with this issue before. All I could do was to make every surface that was parallel to the sensor as non-reflective as possible. I spoke to Ian Broomhead at SRB and he made a few suggestions. One was the application of a flock material, but I also followed his advice on the sort of paint to use to cut down the reflections. His suggestion was a paint intended for builders of models (cars, trains, that sort of thing) and sold in very small tins (Humbrol Matt Black 33). As the adaptor had to go back to SRB for adjustment they also applied some flock to the area inside the lens mount. Although not parallel to the sensor, flock on this area couldn't hurt. Most of the other surfaces of the adaptor had to be painted.

One of the problems that dogs users of digital cameras is dust on the sensor (in fact not really on the sensor itself, but we have dealt with that one before). What I didn't want to do was add to the problem. If I was going to put paint inside the lens I had to make sure that it was properly keyed in, so that the paint would stay put and not flake off with time. The last thing that I wanted was to have specks of paint travelling at will around the area of the mirror box. The key (pun intended) was the primer. I chose an acid-etch primer that would slightly eat into surfaces onto which it was applied, and so form a good bond. Primer like this is available from auto accessory shops, although a friend happened to have some, so that was rather convenient.


Once all of this was done I was impatient to retest the lens. So far all tests have proved successful. I re-shot the interior of the church and as you see there were no signs of flare (St George's church, Lower Brailes - see above). The two shots were done at a similar time of day and with similar weather conditions outside (both shots are a "comp" of four frames). Other tests have proved similarly successful. With familiarity, high resolution shots can be achieved with minimal fuss and effort.

One final point is the issue of shielding the lens. I am a great advocate of lens hoods, particularly rigid ones or bellows hoods. Because of the wide image circle most lens hoods are out of the question. The one intended for the lens is so shallow that it looks more like a small plate with a hole in. I think that the answer is to flag the lens and I am working on a solution that will attach either to the tripod or the camera hot shoe - more on this another time.

So there you have it. If the project sounds interesting why not give it a go. I think you will enjoy the result. The image of the Ruark speaker at the top was taken with the plane of sharp focus angled to follow the front of the wooden cabinet.

Part 1
Part 2

Tuesday 17 July 2007

Have your say - Adobe Photoshop survey

Let Adobe know what you would like in Photoshop and Bridge. The survey only takes a few minutes.

Sunday 15 July 2007

The Hartblei 45mm Super-Rotator (Part 2)


Following my first piece about this lens and how it came to be, I thought it would be a good idea to describe the situations in which you would use a lens like this and something about what it is like in use. Those who have previously used large format cameras will be well aware of the application of camera movements, but for those who are unfamiliar, this may help. The lens is able to shift (that is to move the lens axis either up or down or to one side or the other) and/or tilt (change the angle of the axis of the lens). More about camera/lens movements can be found here.

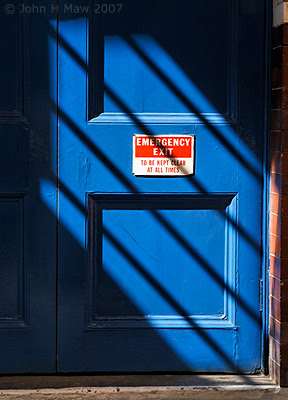
Tilt movements change the angle of the lens axis. This in turn changes the angle of the plane of sharp focus (as well as the planes defining the limits of depth of field). This can be used to keep objects that are at varied distances in focus, or as is common in much contemporary commercial photography, to throw parts of an image out of focus. This approach can also be seen in the image of the church interior near the bottom of this piece. The roof is completely out of focus. The tops of the pews are sharp from near to far. The floor at the bottom of the frame is un-sharp. Even on such a small reproduction the impact of this treatment is quite clear. It shows up much better in larger images. The same technique was also applied to the shot of Denham Village used in an earlier piece.

The shift movements would often be used to overcome problems of converging lines, as might be found when photographing tall buildings from ground level. Aim the camera up and the sides of the building taper in towards the top. Shift the lens up while keeping the camera level (pointing horizontally) and the sides of the building stay parallel.

Shift movements can also be used for stitching purposes (no sewing skills required). If you have sufficiently large shift movements you can capture several frames whilst keeping the camera facing in one direction. Unlike panoramic photography where the camera is rotated, these images don't require special software to combine them. Any image editing program that supports the use of layers (layer masks are also useful, but not essential) will do the job. Shift and tilt movements can easily be used together, but where stitching is concerned it is probably wise to avoid using tilt unless you really need it. Having said that, it could produce some interesting results. I will have to experiment. The result is often very large images and equally large files.

Main controls for shift and tilt movements

The first thing that you notice about this lens is that it is quite big and heavy. There is no plastic used in the making of this lens - well, none that I could see anyway. Metal rules here (heavy metal at that). The next thing that you notice is that it has a lot of knobs and levers. Working from the filter thread back to the lens mount, these are the controls (see image just above): Large focussing ring, aperture ring with two little "tabs" attached - makes finding the aperture ring by feel very easy. A ring marked in millimetres for the lens shift. A tab that unlocks the rotation of the shift movement. A knob sticking out that applies tilt. A locking slider to release the rotation of the tilt movement. Behind that on my lens is the adaptor, which has a knob that is rotated for the extra 11mm of shift. The rotation of this movement is not locked, but clicks into a number of pre-set positions.

The lens is a fully manual lens in every way. There are no connections with the camera beyond the lens mount itself. Most lenses allow you to set the aperture you want to use for the shot but leave the lens open while framing the shot for a brighter viewfinder image. Not this one. Open the aperture wide to compose and (manual) focus, and then close it down as required for the exposure and depth-of-field. In use the lens is a dream to use. When I first started using it I was struck by how much I felt in control of the image in a way that I had not experienced since I stopped using a 5"x 4" camera. Being able to control perspective and focus (as in Scheimpflug) is something that users of rigid-bodied cameras don't normally experience to the full. But one solution leads to another problem. Critical focussing on a focussing screen designed for auto-focus isn't easy. I decided I needed to magnify the viewfinder image. I already had an angle finder, but bought one with a built-in magnifier (as seen on the first image in this piece). The magnified image doesn't give full frame coverage, but is useful just at the time of focussing. This worked well enough outside in good light, but I then found that the magnified image was significantly darker, and in the studio I needed a tungsten focussing light, as the modelling lights on the flash were not bright enough. It is not uncommon to do this, but I had never found the need before.

How you approach each shot will depend on the subject matter, but I will run through how the office building shot that accompanies part 1 of this piece was taken. Taking several frames to get one image may seem tedious, but it can be achieved very quickly. When shooting the office building I was standing in the road (there was no footpath on that side) and was keen to get out of the way as soon as possible. I had set up the camera and taken the four shots required in less time that it would have taken to get the Sinar 5x4 out of it's case.

The tripod was set up, and the head levelled. The camera was set in portrait format (RRS or Kirk "L" brackets are a nice refinement here). As already mentioned, the lens has no connection with the camera, so aperture settings are made on the lens (nor is any EXIF data recorded for this lens). The camera doesn't even know that there is a lens attached. It only knows how much light is recorded by the meter. The aperture was opened up for focussing and to give a brighter image in the viewfinder. The exposure mode was set to "manual" which is where it normally is anyway on my camera.

Full upward shift of 11mm was applied to the adaptor (lets call it "back shift") Then full shift of 12mm was also applied to the lens (for the purposes now called "front shift"). All movements on the lens are independently rotatable, so the front shift direction could be changed to give four different images (top left, top right, bottom right and bottom left) that together would make one larger image. Before taking the shot I checked that at the four rotation positions I wanted to use I could see all of the building that I wanted to include. The aperture was then set as required for the correct exposure and depth of field and four shots taken (using an electronic shutter release - but self timer would do). The resulting image is similar to one taken with a much wider angle lens with a much higher resolution camera with 11mm of upward shift applied.

That's it. I got off the road and packed away. The images were converted from RAW in DXO (with any auto settings being overridden) and put together in Photoshop. I tried Photomerge in Photoshop CS3 (under the "File - Automate" menu) and although it is now much better than previous versions, I still found some inaccuracies. It was easier to do it myself. Some of the bottom of the image was then cropped off as I didn't feel the need to see so much tarmac.


Limitations: Limited to stationary subjects - beware trees on windy days. Best with full frame cameras, as you can get access to more of the lens' image circle. Also, judging tilt movements on smaller viewfinders is not easy. Even with the reasonably large and bright finder on an EOS 5D critical focusing and application of tilt movements is hard to judge (I once worked with a photographer who shot on 10"x 8" rather than 5"x 4" purely because he preferred using the larger ground glass screen). Canon's cropped frame cameras are not noted for bright viewfinders. I'm not sure how Nikon viewfinders compare, but I gather that they may be a bit brighter.

Non-limitations: Surprisingly, the lens works quite well hand-held. Using tilt hand-held is good fun, rather like (and at the same time totally different from) using a Lensbaby 3G. Try doing multi-frame stitching with a Lensbaby.

A separate piece will be put up soon dealing with overcoming the problems of internal reflections. There will be a before and after example to show the extent of the initial problem of light reflecting between the sensor and the adaptor.

Part 1
Part 3

Thursday 12 July 2007

The Hartblei 45mm Super (duper) Rotator (Part 1)


The HARTBLEI 45mm Super-Rotator shift and tilt lens is a unique and remarkable lens, even among shift/tilt lenses. This is a short story of the modification of this lens to create something even more interesting for users of digital SLRs. I first read about this lens on Luminous-Landscape quite some time ago (and I recommend that you do the same if you are interested). When I read the article by Michael Reichmann I was sure I would get one of these lenses. Although they were originally designed for use on medium format (645) cameras, more recently they have also been available for popular 35mm SLR mounts. For those who are not familiar with the specification, the lens offers 12mm of shift in any direction, and 8 degrees of tilt, also in any direction, independent of the shift direction. But time went by and one expense led to another and it never seemed pressing, so it was a considerable while later when I saw a used one on eBay. New lenses ship from the Ukraine, but this one was already in the UK and looked to be gaining little interest. Sure enough I got it for just over £100. It turned out to have a mount for a Contax 645 medium format camera (now discontinued), but at the price I wasn't too bothered because I thought I could get it modified and still make a saving.

I started looking round for converters and also contacted SRB in Luton, who are known for their engineering work on photographic equipment. It turned out that Contax 645 to Canon EOS (my camera of choice) converters were few and far between, but Pentacon 6 to EOS converters were readily available. In fact there were converters that had their own shift movements. An idea started to form. To allow shift movements without vignetting (dark areas near the corners), the lens must have a bigger than normal image circle. Imagine moving a rectangle within a circle. The rectangle must not go outside the circle. If you want to move the rectangle more you will need a bigger circle. This lens has an image circle large enough for movements on a 645 camera, so on a 35mm camera (or equivalent digital) it is not possible to make use of much of the image area that the lens forms. In other words the same movements but with a smaller rectangle will not get as near the edge of the circle. Therefore, much of the lenses huge image circle would be wasted. An extra shift adapter (with 11mm of shift) would be a way of harvesting some of the extra image circle.

Following conversations with Ian Broomhead of SRB, I purchase a Pentacon 6 to EOS adaptor and sent the lens and the adaptor off to Luton for modifications. Unfortunately for me, its arrival at SRB coincided with a large order from another customer, and so there was quite a delay before the lens was returned to me (I gather that it is large volume jobs like this that allow SRB to make one-off adaptors for people like me at reasonable prices). As you can imagine I was eager to try the new contraption. But my very first shots showed a problem. I took a couple of shots inside the house, and saw pronounced flare. But this wasn't normal lens flare. It was fogging, but only in patches. Not what I was used to seeing. The review of the lens on Luminous Landscape had quite specifically mentioned that it handled flare well. Could mine be so different? My guess was that the problem was caused by internal reflections between the digital sensor and some of the flat surfaces of the adaptor. Not too surprising really. The adaptor was designed in the days of film, when such things were not so much of a problem. Digital camera sensors are much more reflective than film and so light can be reflected back towards the lens. If it finds a parallel reflective surface it is bounced back again towards the sensor where it shows up as a foggy patch.


Surprisingly the problem didn't show up all that often (as in the image above, which is made from four shots). Many outdoor subjects were captured without apparent problems, and I was able to become familiar with the use of the lens in a variety of situations. A combination of black flock material, acid etch primer and matt black paint and the lens was ready for another test. So far, despite my best attempts to provoke it, I have not seen the same problem.

So, what benefits come from extending the shift from 12mm to 23mm? Well, of course the lens can be used just as you would any shift/tilt lens, but now there is also a greater potential for stitching a number of frames together to form very large images, and all without the need for any special software as the images will all align perfectly - they are in fact just pieces of the same image from the same lens. I have already made several images well in excess of 40 million pixels from this lens used with a 12 million pixel camera (EOS 5D). Currently the highest resolution digital back is 39 million pixels. Of course that doesn't make the images as good as from these digital backs. Other factors come into play, but for stationary subjects the combination offers a significant resolution boost. One possible limitation that had occurred to me was that of internal vignetting due to the camera lens throat cutting off part of the image. Well, this does occur, but it happens only on parts of the image that tend to overlapp and the darkened edges can be lost in the process of putting the final image together.

Anyone wanting to get one of these lenses only has to purchase one in Mamiya or Pentacon 6 fit and buy the appropriate shift adaptor from eBay. Mine only needed more extensive work because there were no Contax to EOS shift adaptors. Be prepared to have to do a bit of work to cure reflections caused by the adaptor, but if you don't mind doing so you will probably have a very useful lens.

In part 2 I will look at the circumstances in which you would use a lens like this and how to use it (and to some degree why).

Part 2
Part 3

Summer photography sessions


For those who don't already know and might be interested I am organising a few photography sessions during the summer period. There will be two studio sessions and three or maybe four sessions on location. I shan't give details here, but anyone who is interested in further information should contact me via e-mail (please use the link at the bottom of the page).

Image taken at Woburn Safari Park, June 2007

Monday 9 July 2007

Article alert - Apparent Light Size


The Strobist carries an interesting article entitled "Apparent Light Size". I think that it is well worth a read for anyone interested in small scale still life photography. If you find that piece interesting you might want to look at other articles on the same site. The most valuable part of it is that he is not using highly expensive and specialised equipment, but the sort of kit that many people can easily afford and may already have. Take a look.

Photo: Blue Door - Duke of Yorks Theatre, London 08/07/07 - Taken while sitting outside a cafe with friends, eating a piece of chocolate cake. For some reason that last bit of information gives me great pleasure.